

Post-training a VLM for reasoning with GRPO using TRL
Authored by: Sergio Paniego 🚨 WARNING: This section requires substantial computational resources. A Colab run uses an A100 GPU. This section shows how to post-train a Vision Language Model (VLM) with GRPO. The implementation uses the Hugging Face Transformer Reinforcement Learning library (trl). We fine-tune Qwen2.5-VL-3B-Instruct on a subset of the lmms-lab/multimodal-open-r1-8k-verified dataset. Each example contains an image, a problem description, a solution, and a reasoning trace. We use this data format and the GRPO reward functions to train the model to reason toward the solution.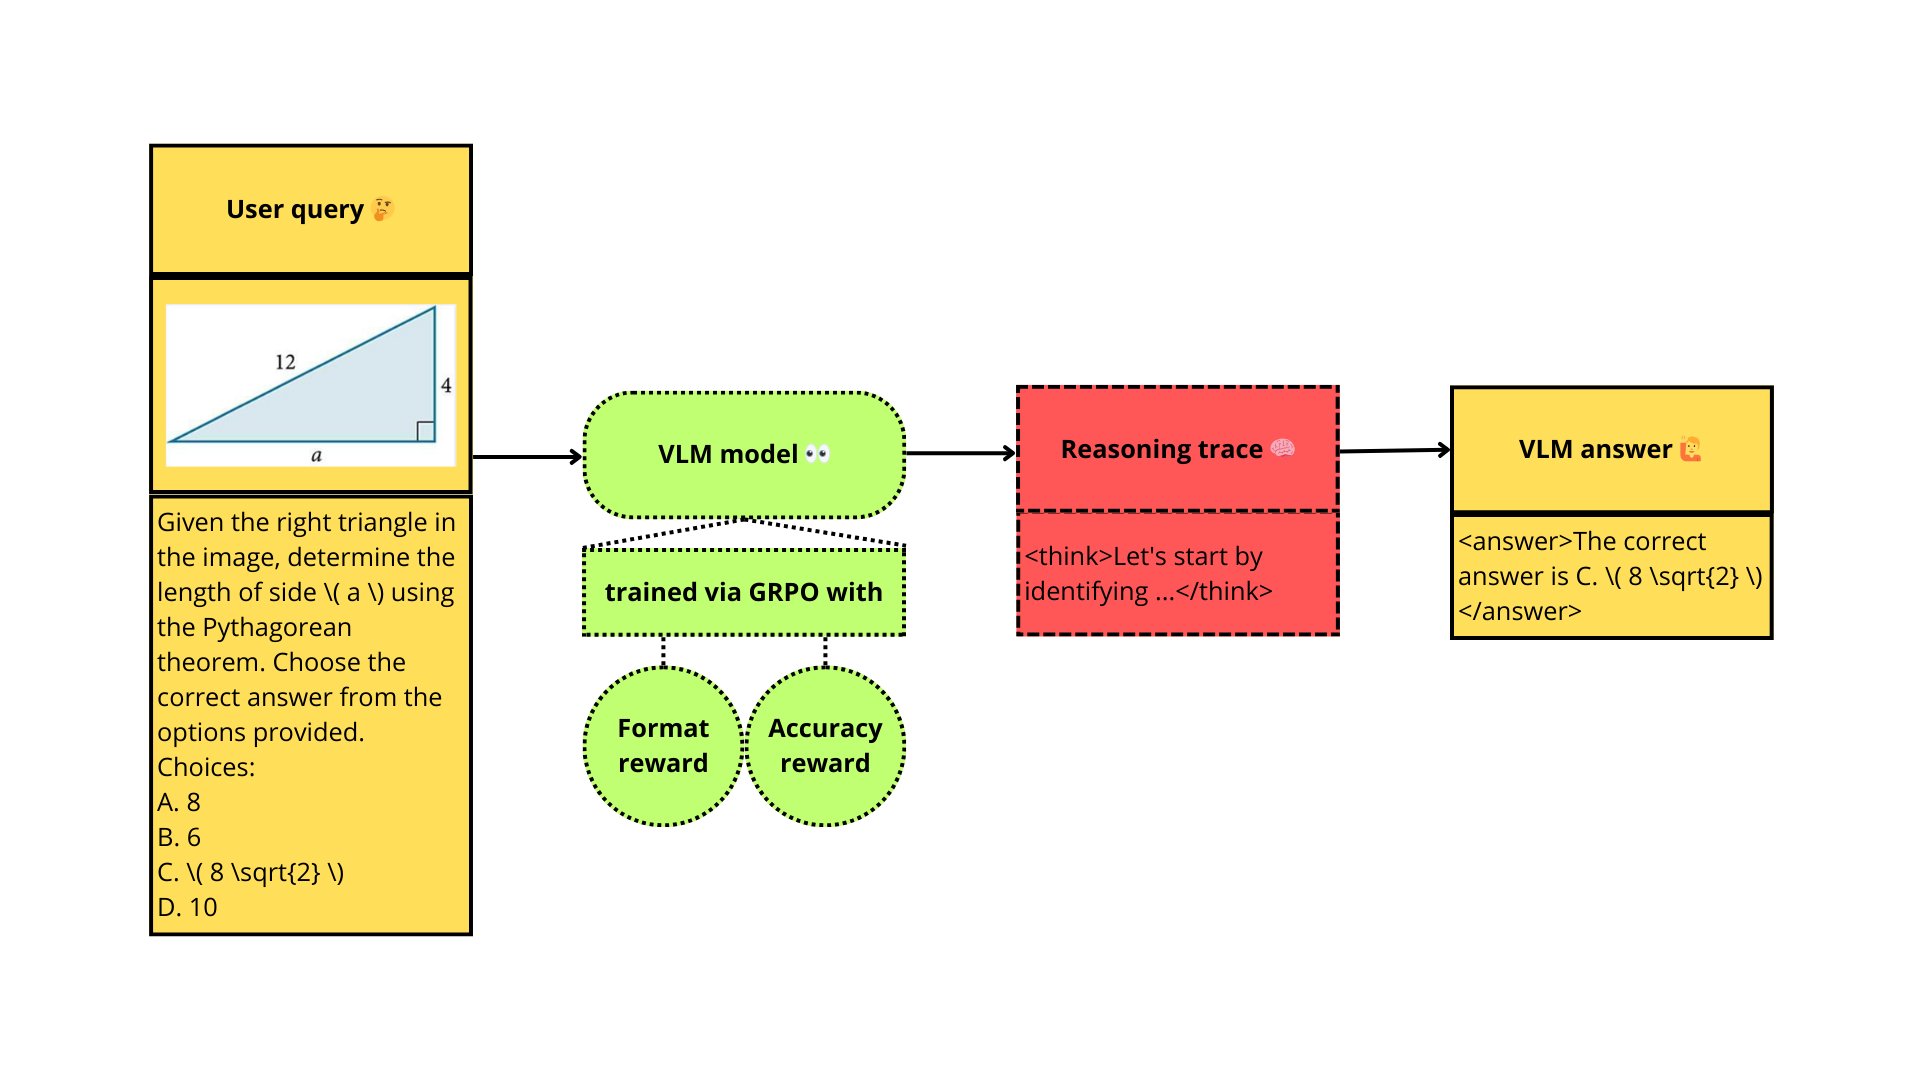
1. Install dependencies
Install the libraries required for fine-tuning. Installtrl from source because, at the time of writing, the official release does not include the VLM GRPO trainer.
2. Load the dataset 📁
This section uses lmms-lab/multimodal-open-r1-8k-verified. The dataset contains 8,000 multimodal reinforcement learning examples for mathematical reasoning. GPT-4o generated the data. Each sample includesimage, problem, solution, original question, and original answer. The data comes from this project.
We use image and problem as inputs and solution as the output so the model learns to reason from images.
To reduce training time, we use 5% of the dataset and split it into training and test sets. A full training run would use the complete dataset.
Load and split the dataset.
problem and image columns, we include a custom system prompt that specifies the output format.
The system prompt is adapted from DeepSeek R1. See this previous recipe for details.
We convert each dataset sample to the conversation format expected by the GRPO trainer. Each conversation contains the system prompt, one image, and one problem description.
We set padding_side="left" so each generated completion follows its prompt directly during training. GRPO requires this arrangement to compare token-level probabilities between preferred and rejected responses.
3. Post-training the VLM with GRPO
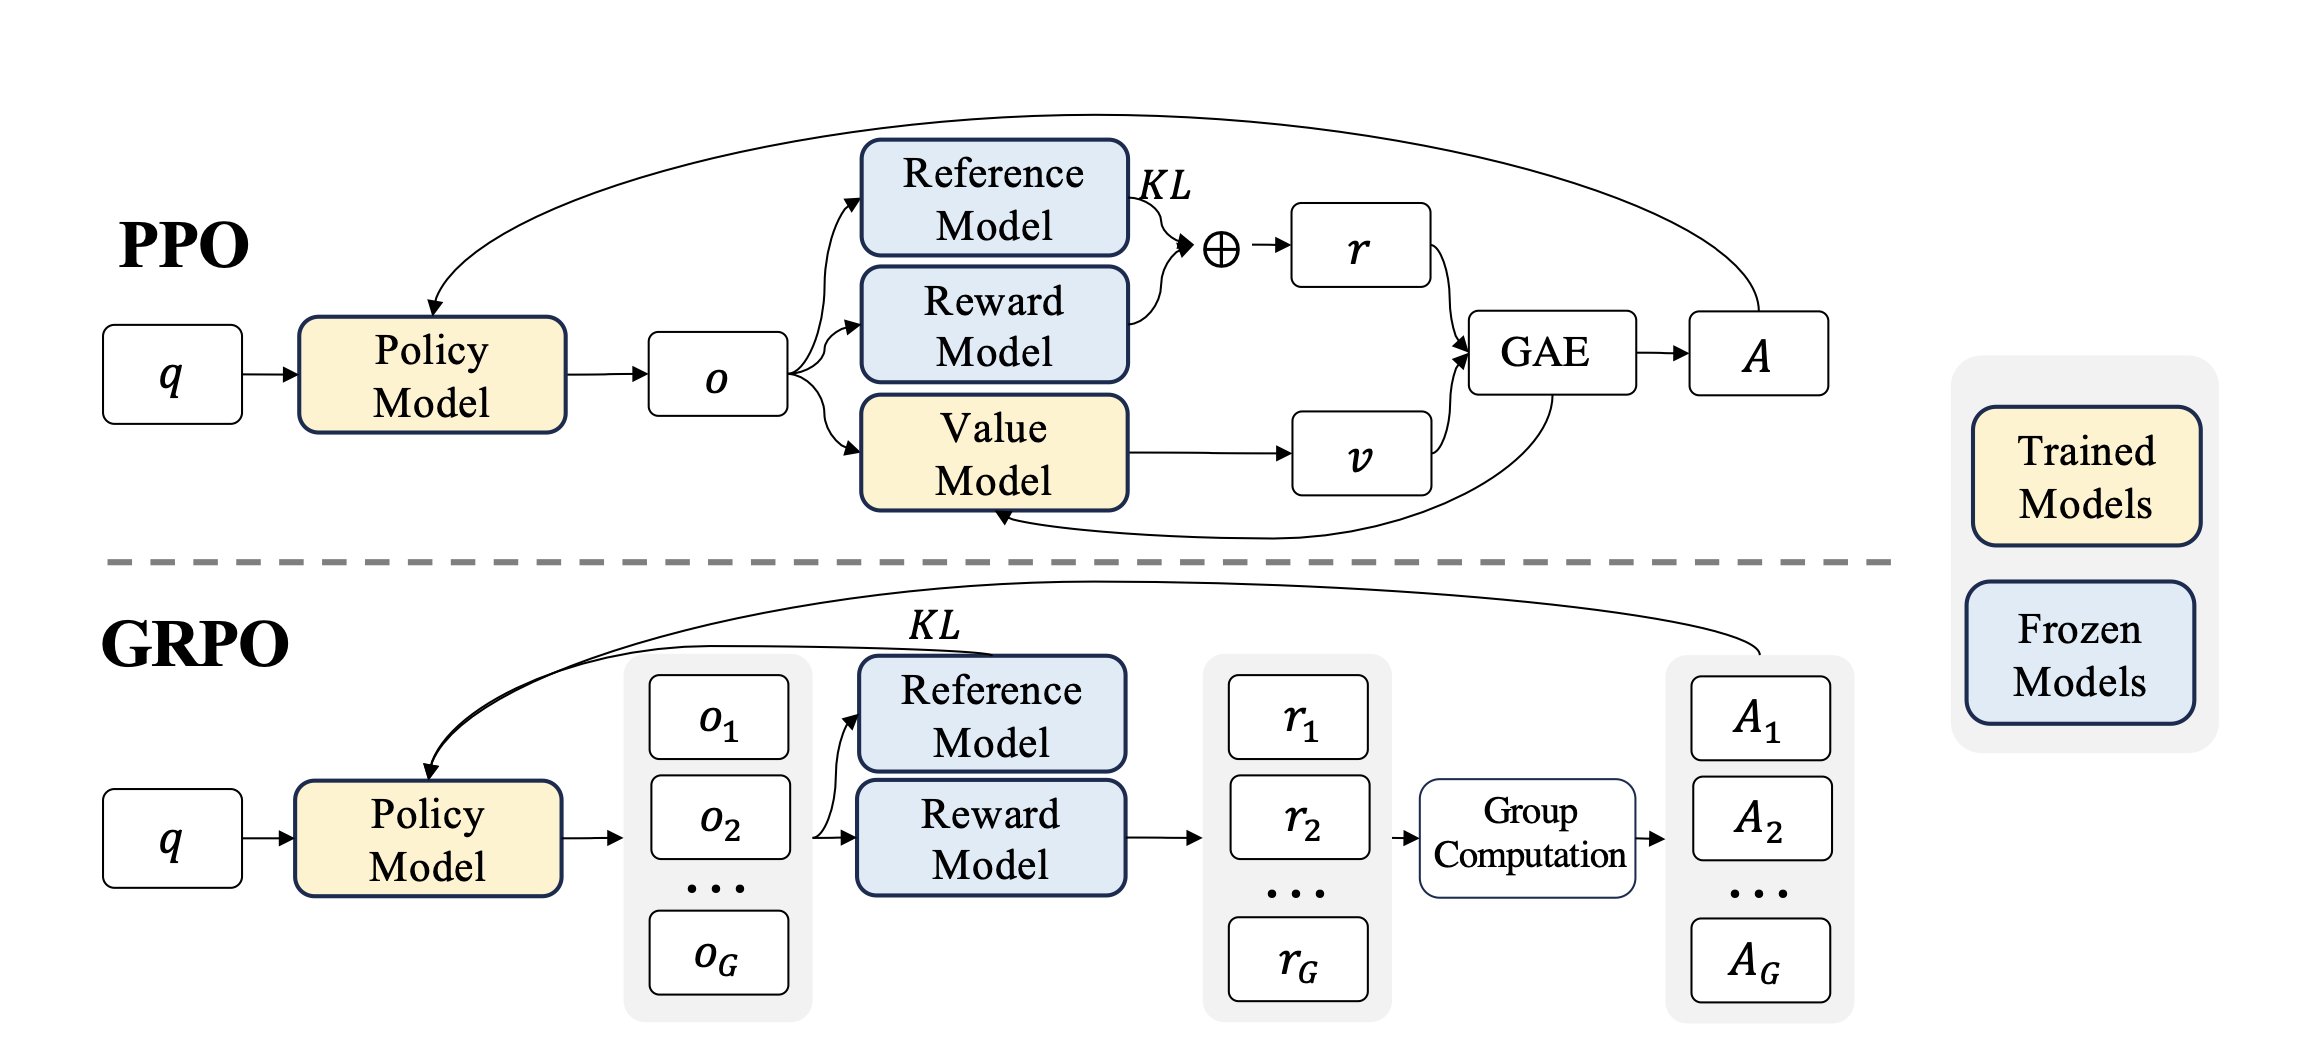
The diagram below shows the main difference between PPO (Proximal Policy Optimization) and GRPO (Group Relative Policy Optimization): GRPO does not use a value model. See this further explanation for more detail. The training pipeline uses trl, the Hugging Face reinforcement learning library. We use theGRPOConfig and GRPOTrainer classes. Custom reward functions specify the behavior required by the training objectives.
First, load Qwen/Qwen2.5-VL-3B-Instruct, a VLM developed by Qwen. A model with more parameters may produce better results.
Other VLM projects with reasoning capabilities include:
3.1 Load the baseline model
Load theQwen/Qwen2.5-VL-3B-Instruct baseline model.
3.2 Configure LoRA
Configure LoRA for training.3.3 Load the reward functions
The reward can come from a pretrained reward model or from functions defined in code. The DeepSeek-R1 authors used an accuracy-based reward to evaluate whether a response is correct. They also used a format-based reward to require reasoning inside<think> </think> tags. See the Open R1 implementation for details. Here, we implement the rewards as Python functions.
We use the following reward functions from the Open R1 implementation:
- Format enforcement: Requires the generation to use
<think> </think> <answer> </answer>tags for reasoning.
- Solution accuracy: Compares the generated solution with the
solutioncolumn in the dataset.
3.4 Configure the GRPO training parameters
Configure the GRPO training parameters. You can varymax_completion_length, num_generations, and max_prompt_length to compare training configurations.
These parameter values fit the hardware limits of a Google Colab session. Larger models, more generations, and a larger, diverse dataset would allow more complete training. These changes may improve the rewards, especially for the second objective, and may improve reasoning performance.
3.5 Train the model 🏃
Configure the trainer and start training. Pass the model, training arguments, dataset, and the two reward functions defined above to the trainer. The diagram below shows the training procedure from the Open-R1 project.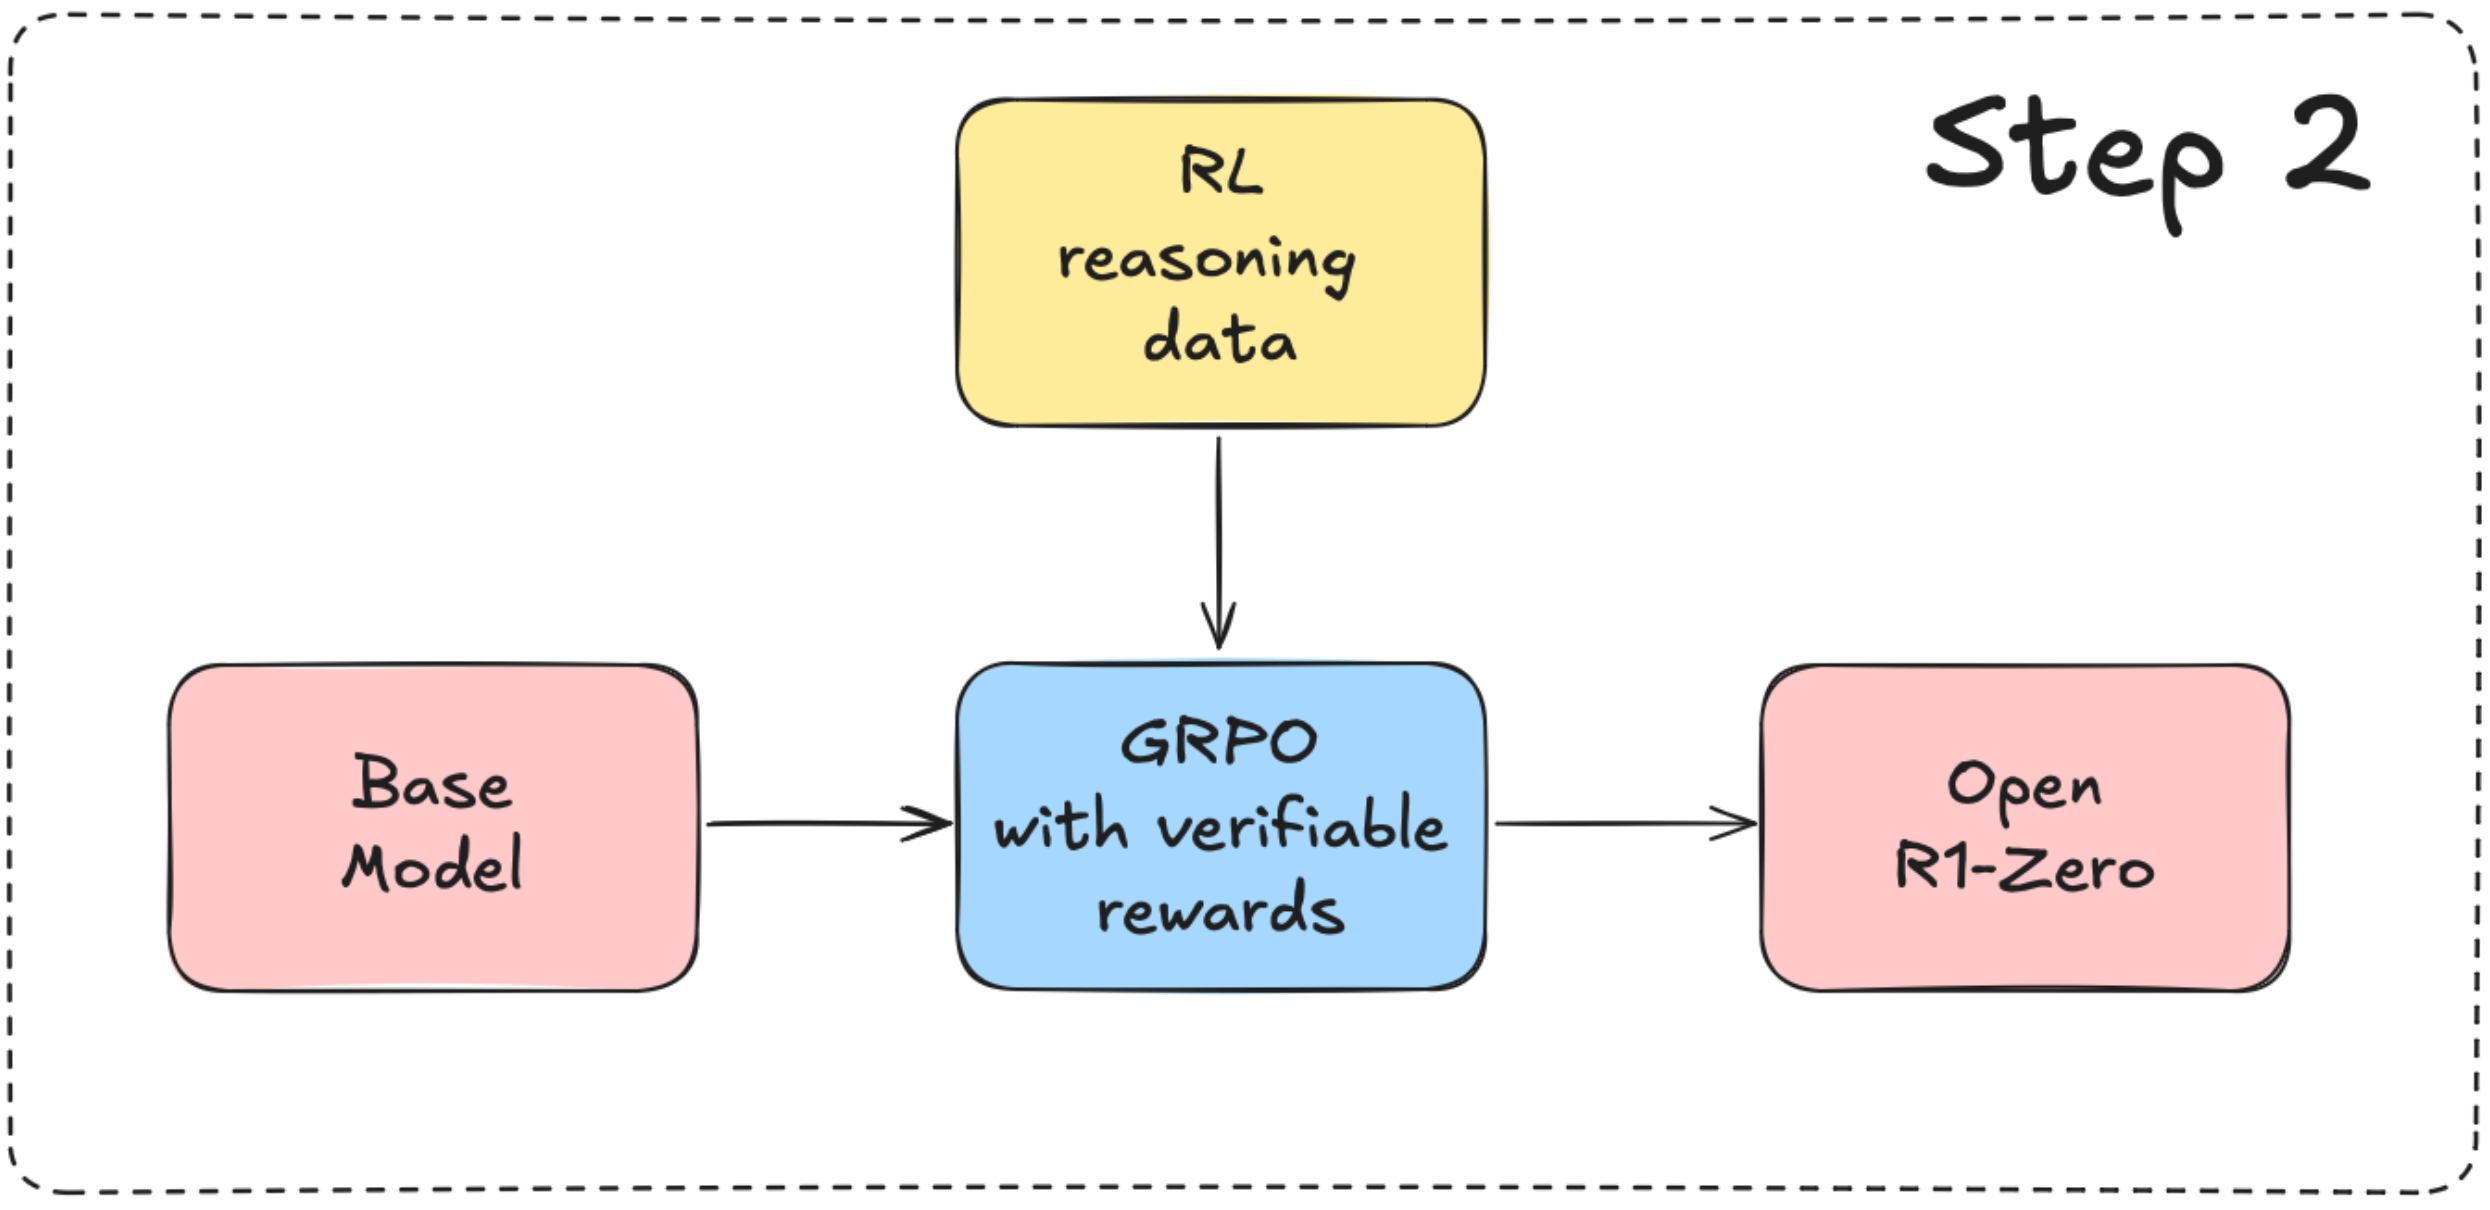
[307/307 1:48:37, Epoch 1/1]
| Step | Training Loss |
|---|---|
| 10 | 0.000000 |
| 20 | 0.000000 |
| 30 | 0.040757 |
| 40 | 0.000000 |
| 50 | 0.067859 |
| 60 | 0.000000 |
| 70 | 0.000000 |
| 80 | 0.000000 |
| 90 | 0.000000 |
| 100 | 0.000000 |
| 110 | 0.000000 |
| 120 | 0.000000 |
| 130 | 0.000000 |
| 140 | 0.000000 |
| 150 | 0.000000 |
| 160 | 0.015370 |
| 170 | 0.000000 |
| 180 | 0.000000 |
| 190 | 0.000000 |
| 200 | 0.000000 |
| 210 | 0.000000 |
| 220 | 0.052498 |
| 230 | 0.000000 |
| 240 | 0.000000 |
| 250 | 0.000000 |
| 260 | 0.013925 |
| 270 | 0.000000 |
| 280 | 0.000000 |
| 290 | 0.013467 |
| 300 | 0.000000 |
4. Evaluate the model
Evaluate the trained model qualitatively.Restart your session to release the resources used for training.
<think>reasoning</think><answer>solution</answer>. Compare it with the reference solution to determine whether it is correct.
5. Further reading 🧑🎓
The following resources cover GRPO, reasoning, and VLMs:Post training an LLM for reasoning with GRPO in TRLrecipe and the linked resources that it includes- GLM-4.1V-9B-Thinking paper
- TRL GRPO for VLMs example
Found an error on this page? Report an issue.